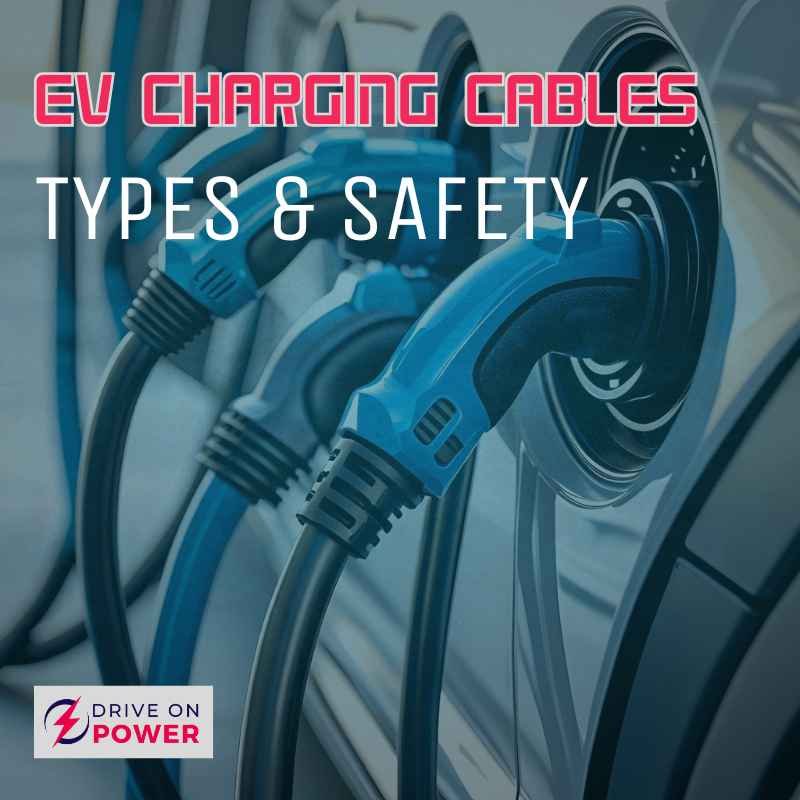
What Cable Should You Use for Your EV Charger? EV Charging Cables Guide Electric vehicles rely on specialized charging cables (sometimes called charging cords) to deliver power from a charger to the car. These cables are essential for charging an electric car, but they are not all interchangeable. EV charging cables vary by type, connector, power rating, length, and usage. Understanding what cable to use for an EV charger means matching the cable to your vehicle’s inlet, your charger’s outlet, and the power level you need. In this guide (focusing on the USA), we explain EV cable types, plugs/connectors, and safety considerations – including whether you can use an extension cord with your EV charger. Figure: Electric vehicle charging port and cable. EV charging cables safely carry power to your car’s battery. Electric car charging cords come in different “modes” and levels. In North America, most EVs (except Tesla) use the SAE J1772 connector (also called Type 1) for Level 1 and Level 2 AC charging. Level 1 charging typically uses a 120 volt plug (NEMA 5-15) at 12–16 amps, delivering about 1–2 kW. Level 2 charging uses 240 volts at 16–50 amps (depending on the charger), delivering 3.6–12 kW or more. EVs come with a portable charging cable (Mode 2) that plugs into a standard outlet; this cable has an In-Cable Control and Protection Device (IC-CPD) for safety. Home and public stations often have longer Mode 3 cables fixed or tethered to the station. High-power DC fast chargers use built-in, heavy Mode 4 cables that supply DC directly to the battery. Critically, EV charging cables are not all the same. They differ in connector type (J1772, Tesla NACS, CCS, CHAdeMO, etc.), power rating (ampacity), and even the communication/control electronics they carry. Simply put: “not all EV charging cables are the same”. For example, an EV cable that works on one car or station may not fit another without an adapter. In the following sections, we unpack the main cable types, connectors, and what you need to know to choose the right cable and extension solution for your EV. Are All EV Charging Cables the Same? No. EV charging cables vary by design, compatibility, and function. They come in different “modes” (Mode 1–4) and connector standards. In practice, the cable you need depends on: Connector/plug type: The plug at each end must match the station and the vehicle. For example, in the U.S. nearly all non-Tesla EVs have a Type 1 (SAE J1772) inlet for AC charging, so one end of the cable must be J1772. The other end (into the charger) is typically also J1772 for home or public AC charging. DC fast charging uses different plugs (CCS1 in North America, Tesla’s NACS or CHAdeMO for some older cars). Tesla cars use Tesla’s proprietary plug (now called the North American Charging Standard, NACS) for both AC and DC charging in the U.S. Power rating (amps): Charging cables are built to handle certain current levels. Common ratings are 16 A (≈3.6 kW on 240 V) and 32 A (≈7.2 kW single-phase or 22 kW three-phase). You should pick a cable rated for at least your car’s maximum charging rate. Using a cable with a lower amp rating than the charger or car can overload the cord. Cable length: Longer cables allow more flexibility but can be heavier and more expensive. Typical lengths range from 10 ft (3 m) to 25 ft (7.5 m). NEC limits EVSE cable lengths to 25 ft due to voltage drop, so don’t use excessively long or daisy-chained cables. Mode and context: Consumer EVSE cords (Mode 2/3) differ from industrial DC cables (Mode 4). A Mode 2 or 3 cable carries AC power and communication for basic controls. Mode 4 fast-charge cables carry high-power DC and usually stay attached to the charger. Pod Point sums it up: “EV charging cables are not all the same and come in different variations”. In short, you must use a cable that’s designed for EV charging, matches your car’s inlet, fits the charger’s outlet, and is rated for the current you want. Types of EV Charging Cables (Modes 1–4) EV charging cables are often categorized by “modes,” which reflect how they connect and what safety/control they include. Briefly: Mode 1: A plain cable with a standard plug at one end. This simply connects a light EV (e-bikes, scooters) to a regular wall outlet, with no smart communication or protection. For cars, Mode 1 is unsafe and mostly banned. It uses a basic extension cord style cable. Mode 2: The portable EVSE cable that usually comes with an EV. One end is the car’s connector (e.g. J1772) and the other end has a regular 120 V plug (NEMA 5-15) for a household socket. It includes an in-line control box (IC-CPD) with safety electronics. Mode 2 is Level 1 charging (up to ~2.3 kW on 120 V) if plugged in at home. EV manufacturers supply this so you can charge anywhere. It’s safe for cars due to the IC-CPD, but it’s very slow and can overload circuits if used continuously. Mode 3: The standard cable for dedicated EV chargers (Level 2). One end plugs into a fixed charging station’s socket, the other plugs into the EV. In North America, that means a J1772–J1772 cable for most EVs. In Europe, it’s Type 2–Type 2. Mode 3 cables carry 240 V AC at higher currents (16–80 A) for up to 19.2 kW (single-phase) or 43 kW (three-phase). These cables have communication and safety features. Most home chargers (wallboxes), public AC stations, and workplace chargers use tethered or untethered Mode 3 cables. Mode 4: Cables for DC fast charging (Level 3). These deliver high-voltage DC straight to the battery. They are heavy duty (often liquid-cooled) and are permanently connected to the charger – you cannot unplug them from the station. In practice, you’ll see CCS or CHAdeMO cables on fast chargers, but you cannot buy a separate Mode 4 “extension cord” yourself. They’re integrated into the charger hardware. Figure: Multiple EV charging plugs/cables at a station. In North America, most EVs use the J1772 AC plug (Type 1) for everyday charging, while DC fast chargers use CCS1 or
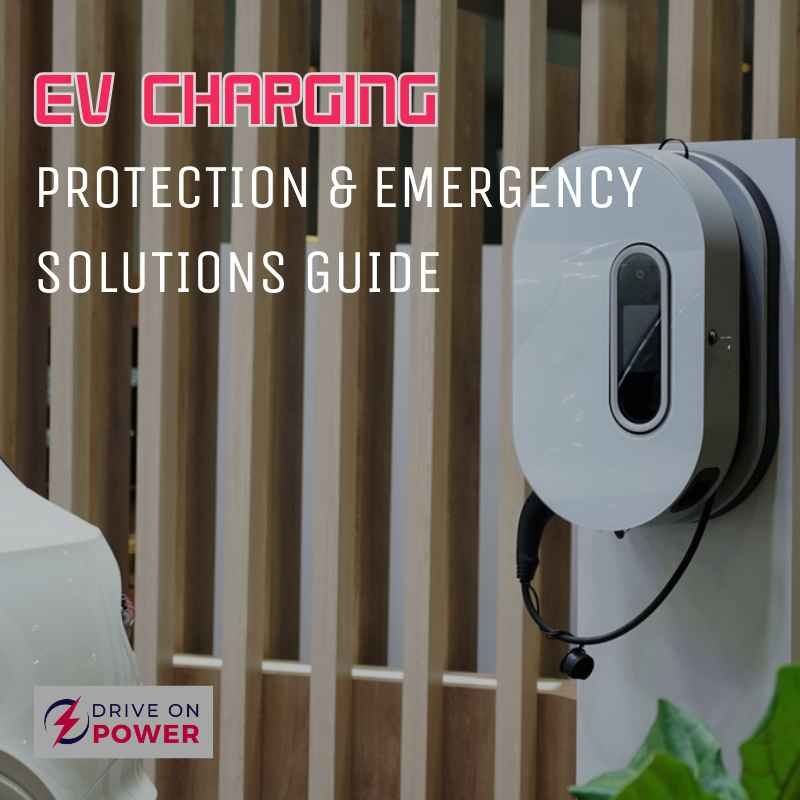
EV Charging Protection, Emergency Solutions, and Apartment Infrastructure
EV Charging Protection, Emergency Solutions, and Apartment Infrastructure As electric vehicle (EV) adoption rises (8.6% of U.S. vehicle sales in 2023 and projected to grow substantially), ensuring safe, reliable charging is crucial. EV charging infrastructure must be protected from damage and theft, and drivers need emergency options when batteries run low. At the same time, apartment communities are increasingly installing EV chargers to attract eco-conscious tenants. This comprehensive guide covers EV charger protection methods, emergency mobile charging solutions, and EV charging in apartments, with actionable tips for EV owners, property managers, renters, and roadside service providers. Recommended: EV Charging Systems & Methods EV Charger Protection Methods An EV charger protection system includes barriers and security features that safeguard charging stations from vehicle impacts, vandalism, and weather. Physical guards like bollards, posts, or barriers are commonly installed around charging units to prevent cars from accidentally striking them. For example, concrete or metal bollards (short posts) and wheel stops (parking curbs) create a buffer that keeps vehicles at a safe distance. These devices are often required by safety standards to maintain clearances (e.g. 3 feet) around chargers. Bollards/Posts: Sturdy posts placed around chargers to block vehicle impact Wheel Stops: Parking blocks in front of chargers to prevent cars from rolling into equipment Cable Protectors: Rigid covers or ramps over charging cables to prevent tripping hazards when laid on the ground. Enclosures & Covers: Weatherproof housings or locks for chargers and cables protect against rain, sun, and vandalism. Beyond physical barriers, securing the charger and cable is important. Many home and public chargers allow locking the connector to the car or using a padlock, making it hard for thieves to steal the cable. Some EVs have built-in locking loops for cables. A tethered charger (one permanently affixed cable) also deters theft since the cable cannot be removed. Smart chargers offer built-in security PINs or app controls to lock out unauthorized use. Installing surveillance cameras, motion-activated lights, or even a dashcam can deter vandals and thieves. New technologies are also emerging: for instance, ChargePoint’s “Protect” system uses the charger’s speakers and lights to sound an alarm if cable tampering is detected. Some networks are deploying cut-resistant charging cables made of novel materials to make theft more difficult. Protection Method Purpose/Description Bollard/Post Barrier Prevent vehicle collisions with charging unit. Wheel Stop Parking curb to keep car at safe distance from charger. Lockable Charger/Cable Padlocks or tethered cables to deter theft. Surveillance/Alarm Cameras, lighting, or alarms to catch tampering. Weatherproof Enclosure Sealed boxes or covers to protect from rain/sun. Proper charger protection also includes insurance and policy: homeowners or building insurance may cover charger damage if installed permanently, but check policies. Finally, always store portable charging cables securely indoors when not in use. In short, combining barriers, locks, and monitoring can greatly reduce the risk of physical damage or theft to EV charging equipment. EV Emergency Mobile Charging Solutions Even with careful planning, EVs can run out of charge on the road. Unlike gas cars, EVs can’t simply “push start,” so drivers must plan for emergencies. Portable chargers and mobile charging services are the solutions. A standard Level 1 (120V) portable charger – the 8–12 amp cord many EVs include – only adds about 2–3 miles of range per hour. According to Tesla, a 120V outlet “supplies 2 to 3 miles of range per hour charged”. The U.S. Department of Transportation notes that Level 1 charging can take 40–50+ hours to recharge a full EV battery to 80%. This is clearly too slow for roadside emergencies, offering essentially an “overnight trickle” (a few miles gained per hour). For faster fill-ups, Level 2 charging (240V) at 30–50 amps is common: it can deliver tens of miles of range per hour, enough to top up most EVs overnight. For true on-the-road emergencies, battery-powered mobile chargers bring DC fast charging to the car. These units are typically installed in service vehicles (vans or trucks) and carry a high-capacity battery and inverter. For example, SparkCharge’s Roadie Portable system stacks 3.45 kWh battery modules with a 20 kW DC charger to deliver “about a mile per minute of range”. By adding multiple battery packs, Roadie can provide up to ~60 miles of range in one deployment. Similarly, specialized systems like Power Sonic’s EVES series combine DC fast charging and integrated batteries to create an on-demand charger. These off-grid fast chargers can output 30–120 kW and are ideal for breakdown and emergency response. In use, a mobile charger can quickly boost an EV’s battery to get home or to the nearest station (often in under an hour to 80%). Battery-powered mobile EV chargers (like Power Sonic’s EVES shown above) carry an internal battery pack and DC fast charging cables, enabling on-the-spot charging anywhere without grid connections. On the service side, companies like BeeCharged EV and Amped Up EV Charging offer 24/7 mobile charging assistance. They dispatch technicians with portable chargers or use these battery-powered units to reach stranded EV drivers. For fleet operators, charging-as-a-service providers (e.g. SparkCharge’s CaaS) handle mobile charging logistics entirely, swapping charged battery units and monitoring usage remotely. Summary of emergency options: Solution Typical Speed/Range Use Case Level 1 Portable (120V) ~2–3 miles of range per hour Overnight emergency at home (very slow) Level 2 Portable (240V) 10s of miles of range per hour Extended travel (requires 240V outlet) Mobile DC Fast Charger (Battery) ~20 kW (≈20 mi of range per hour) Roadside fast fill-up (e.g. SparkCharge Roadie) Mobile Charging Service Varies (e.g. 50–65 kW) On-demand professional EV charging (BeeCharged, AmpedUp) In practice, EV drivers should carry a basic Level 1 cable for emergencies (even a few miles can help reach a proper charger) and keep an app like PlugShare handy to locate public charging. For range anxiety, some drivers also invest in “range extender” battery packs or portable Level 2 chargers (hardwired to 240V) when allowed. Commercial roadside services are expanding fast: for instance, Voltai’s 56 kWh van-mounted charger delivers 60 kW to stranded EVs without permits. These solutions ensure that an EV isn’t

Best CHAdeMO to CCS EV Charging Adapters: Top Picks & Buying Guide
Best CHAdeMO ↔ CCS EV Charging Adapters Electric vehicle (EV) owners with older Japanese cars like the Nissan Leaf, Kia Soul EV, Mitsubishi i-MiEV, or Outlander PHEV (all of which use the CHAdeMO DC charger plug) are increasingly stranded as U.S. fast-charging networks shift to CCS (Combined Charging System) or Tesla’s NACS. (Nissan has sold over 210,000 Leafs in North America, all with CHAdeMO ports, yet many DCFC stations now only offer CCS1 plugs.) To bridge this gap, aftermarket CHAdeMO-to-CCS adapters (and vice versa) have appeared. These heavy-duty adapters let a CHAdeMO-port EV charge from a CCS1 DC fast charger or allow a CCS1 EV to use a CHAdeMO charger. They’re essentially small computers with cables. In this guide we review the top CHAdeMO ↔ CCS adapters on the U.S. market, link to Amazon listings, and cover specs, pros/cons, compatibility, charging speed, build quality, and real‐world usage. How CHAdeMO↔CCS Adapters Work EV charging adapters like these are essentially DC protocol converters. The CCS and CHAdeMO standards use different electrical and data interfaces: CCS (and Tesla’s NACS) use power-line communication (PLC) for the handshake, whereas CHAdeMO uses a separate CAN-bus signal. The adapter houses a battery-powered controller that translates between the protocols. In practice, you plug the adapter into the charger (e.g. CCS1 output) and then plug its CHAdeMO end into your car (or vice versa). The adapter lights up and runs self-tests, then initiates charging. Because the translator circuitry adds complexity, these adapters are much larger and heavier than simple AC or Tesla adapters. For instance, one CHAdeMO→CCS adapter on Alibaba is described as “big, bulky, and expensive”. Safety is critical: most designs include fuses and temperature cutoffs (e.g. dual thermal kill-switches) to shut off if something overheats. Key Specs: Adapters are usually rated up to 250 A and 1000 V, i.e. 250 kW max. (This exceeds what most CHAdeMO cars can use – e.g. the Leaf’s onboard charger maxes at 62.5 kW.) The actual charging speed will be limited by your car’s capability and the station’s output. All adapters list an IP rating (typically IP54 or IP55 for dust/water resistance. Because firmware can be updated, some vendors promise fixes for new charger models. In short, these adapters work like a small DC fast-charger “translator box” between your car and the charging station. Why You Might Need a CHAdeMO to CCS Adapter With more EVs hitting the road, charging connector types can be a headache—especially when you’re switching between CCS and CHAdeMO plugs. Whether you drive a Nissan Leaf, Kia Soul EV, or older Tesla, a reliable adapter lets you charge across multiple networks without getting stranded. Things to Know Before Buying a CCS or CHAdeMO Adapter – Always check vehicle compatibility (some EVs don’t support adapter use).– Make sure the adapter supports DC fast charging (Level 3).– Look for UL or CE certification for safety.– Check if the adapter has heat-resistance and IP-rated waterproofing.– Compare charge speed (kW), supported voltage, and connector type (male/female). Top Picks: CHAdeMO ↔ CCS Adapters CCS1 To CHAdeMO EV Charger Adapter | 250A CCS Essentially the same spec 250A/1000V adapter sold under another listing. Like the TryBox unit, it’s rated for up to 250 kW and uses durable titanium-copper conductors. Pros/Cons: Similar to above (good capacity, but high cost and heavy). Check Price CCS1 To CHAdeMO Adapter | 250 A | 1000 V (up to 250 kW) for CHAdeMO EVs Designed for Japanese EVs (Leaf, Soul EV, etc.), it promises fast charging performance. Pros: High current capacity, rugged shell, built-in temperature safety. Cons: Very expensive (~$1.7K on Amazon), no official UL/SAE certification, bulky size. Check Price Lectron J1772 to Tesla Adapter | 80 Amp | 250V The Lectron J1772 to Tesla Adapter (80 Amp, 250V) is designed to help Tesla owners access a broader range of public charging stations across the U.S. It’s especially useful for those who regularly drive long distances. Check Price What to Look For When shopping for a CHAdeMO to CCS adapter (or CCS to CHAdeMO): Current & Voltage Rating: Aim for at least 100–150 A continuous, but higher is better if the adapter is sturdy. Most top models support up to 250 A/1000 V (250 kW). This ensures you won’t bottleneck faster chargers, even though many older EVs won’t use the full amount. Compatibility: Ensure the adapter matches your CHAdeMO and CCS version. In the U.S., CHAdeMO is standard (single port) and CCS1 (Combo 1) is used for DCFC. (CCS2 and CHAdeMO 2 are mostly European.) Check the product title: e.g. “CCS1 to CHAdeMO” for a CHAdeMO EV to use CCS1 chargers. Also verify it supports your car – typically all CHAdeMO EVs (Leaf, Soul, Mitsubishi) are supported. Build Quality: Look for robust housings and connectors. Many adapters use UL94-V0 or similar flame-retardant plastics. Check for integrated protection features (over-temp, short-circuit). Models like A2Z’s are UL/CE tested. A solid metal or thick plastic handle, indicator LEDs, and sturdy plugs are a must. Ease of Use: The best adapters are plug-and-play: you usually just plug the adapter into the charger cable, then into your car, and press “start.” Some adapters (like A2Z’s) include simple toggles or buttons for firmware modes, but most require no extra steps. Having a carrying case, USB update cable and a 12 V charge cord (to power the adapter’s battery) are nice bonuses (as one user praised on the Accraine model). Safety & Warranty: Be wary: no carmaker or charger network officially endorses these adapters. The CHAdeMO association warns of potential risks (electric shock, burns) and disclaims liability. Look for any available warranty (A2Z offers 1 year; some sellers offer return guarantees). Inspect user reviews: one Leaf owner found the Accraine adapter reliable across networks and called it “good value”. Others note you must charge the adapter itself (its internal battery) via USB or 12 V before use, so budget that into your prep time. Price: Expect to spend $800–1,800 on a CHAdeMO–CCS adapter. For example, the A2Z/Accraine style units run around $999–1,200, while random Amazon imports often list at $1,499–1,786. Price often reflects testing and support; A2Z’s $999 adapter was explicitly tested for safety, whereas many

Understanding Level 1 EV Charging
Understanding Level 1 EV Charging Level 1 EV charging is the simplest, lowest-powered way to charge an electric vehicle. It uses a standard household electrical outlet (in the U.S., a 120-volt NEMA 5-15 socket) and delivers roughly 1–2 kW of power. This translates to adding only about 3–6 miles of range per hour of charging. In practice, a full charge from empty can take anywhere from 8 to 40+ hours depending on the battery size. For example, a Chevy Bolt EV (~60 kWh) gains about 4 miles per hour at 120 V/12 A, requiring over 40 hours for a full charge. Despite its glacial speed, Level 1 charging is very easy to use: you simply plug the EV’s charging cable (often provided with the vehicle) into any grounded 120 V outlet. Many EV owners with short daily commutes (under ~30–40 miles) find that overnight Level 1 charging is adequate to replenish their battery. Figure: A typical EV plugged into a home (Level 1) charger. Level 1 charging uses standard household outlets (120v) to charge your electric vehicle and adds roughly 3–6 miles of range per hour What Is Level 1 EV Charging? Level 1 charging refers to charging an electric vehicle (EV) using 120-volt AC power – the same voltage as standard U.S. appliances (toasters, lamps, phone chargers). A Level 1 EVSE (Electric Vehicle Supply Equipment) is essentially a long, heavy-duty extension cord: one end plugs into a wall outlet, the other end plugs into the car. The EV’s onboard charger then converts this AC power to DC to charge the battery. In North America and Japan, Level 1 cables use the SAE J1772 (Type 1) connector to mate with the vehicle. Level 1 charging is universally compatible with plug-in hybrids (PHEVs) and battery EVs because all EVs have onboard chargers that accept 120 V input. In fact, automakers typically include a Level 1 charging cord with every new EV or PHEV purchase. This “portable EVSE” is meant for occasional or overnight use. In contrast, Europe does not have a “Level 1” category because residential power is 230 V by default. European drivers usually plug EVs into a standard 230 V outlet (Schuko/Type F) at 8–16 amps. This yields roughly 2.3–3.7 kW (about 10–20 mi/h) and is considered slow AC charging (sometimes called Mode 2 in Europe). In practice, home charging in Europe is treated like a low-power Level 2 charger. Top Level 1 EV Chargers EVDANCE Level 1 EV Charger | 110V/240V | 6-16A | 25FT Cable Adjustable current for flexible charging Long 25-foot cable for convenience Compatible with standard outlets Check Price Ecogenix 2025 Upgraded Level 1 EV Charger | 16A | 21FT Cable Upgraded for 2025 models Adjustable current settings Portable design for travel Check Price Portable Level 1 EV Charger | 15A |110V | 21FT Cable Simple plug-and-play setup Compatible with all J1772 EVs Durable and weather-resistant Check Price How Level 1 Charging Works Level 1 EV charging is a form of AC charging. The power from the outlet is alternating current (AC), but EV batteries store direct current (DC). The EV’s onboard charger handles the AC→DC conversion. Since Level 1 delivers only about 1–2 kW, the onboard charger must work relatively slowly (over many hours) to fill the battery. By contrast, Level 3 (DC fast) chargers convert AC to DC off-board at high power and feed DC directly to the battery, bypassing the onboard charger. This is why DC fast chargers (480 V DC, 50–350+ kW) can replenish hundreds of miles in 20–30 minutes, whereas a Level 1 charger takes overnight or longer. Feature / Parameter Level 1 (120 V AC) Level 2 (240 V AC) Level 3 (DC Fast Charging) Voltage & Phase 120 V AC, single-phase 208–240 V AC (US/Japan), 400–1000 V DC (varies by station) 230 V (Europe, single-phase) Typical Power Output ≈1–2 kW ≈3–22 kW 50–350 kW (and up) Connector (NA/Japan) J1772 (Type 1) plug J1772 (Type 1) plug CCS1, CHAdeMO, or Tesla NACS Connector (Europe) — (not used) Type 2 (Mennekes) plug CCS2, CHAdeMO, or Tesla NACS Current 8–16 A 12–80 A up to several hundred amps Approx. Charge Rate ~3–5 miles range per hour ~10–30 miles range per hour ~100+ miles range per 30 min Charge Time (0–80% for 60kWh) 40–50+ hours 4–10 hours 20–60 minutes Typical Use-Cases Overnight home charging; Home, workplace, public Public fast-charging corridors emergencies (shopping centers, offices) (highways, fleet depots) Level 1’s low voltage means very slow charging. For instance, a typical BEV might add only about 5 miles of range per hour at 120 V. A fully depleted 60 kWh battery could take 40–50+ hours (over one to two days) to reach 80% on Level 1. This makes Level 1 suitable only for topping up overnight or for plug-in hybrids with small batteries. Table: Comparison of charging levels for light-duty EVs. Level 1 (120 V) is the slowest, adding only ~2–5 miles of range per hour, whereas Level 2 (240 V) typically adds ~10–20 miles per hour and DC fast chargers add hundreds of miles in under an hour. Level 1 EV Charging Setup Setting up Level 1 charging is usually trivial. All you need is a grounded 120 V outlet (NEMA 5-15R) near where you park the car. No new circuit or permits are required in most cases. The EV’s Level 1 charging cable (often ~15–20 ft long) plugs into the outlet and into the vehicle’s charge port. Many owners keep the vehicle cable at home and simply plug in each night. If you don’t have a conveniently located outlet, you might hire an electrician to install one in your garage or driveway. The electrician can ensure the outlet is properly grounded and on a dedicated 15–20 A circuit (as recommended by the EV manufacturer). Installing a dedicated outlet (instead of sharing one with lights/appliances) avoids tripping breakers and maximizes safety. For outdoor charging, make sure any outlet or cable you use is weatherproof or designed for outdoor use; regular extension cords or unprotected outlets are not recommended. In the U.S., Level 1 uses a three-pronged NEMA 5-15 plug on the cable. In Europe, EV charging from a standard socket also typically uses a Schuko (Type F) plug at up to 10 A (≈2.3 kW). Some European EVs permit 16 A on special sockets (≈3.7 kW),
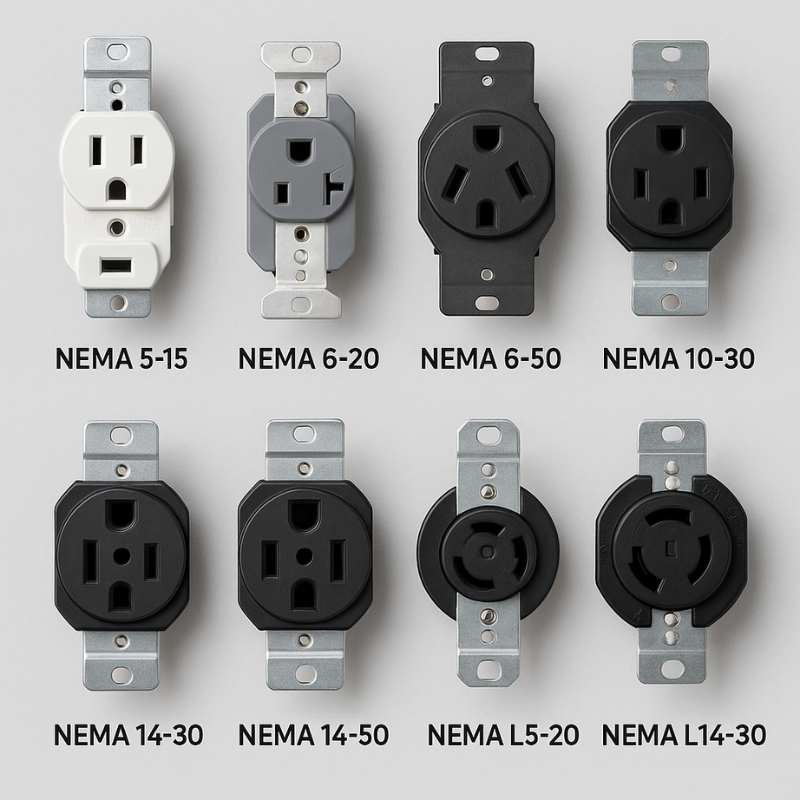
NEMA Outlets for EV Charging: Level 1 (120V) & Level 2 (240V) Outlets Explained
NEMA Outlets for EV Charging: Level 1 & Level 2 Homeowners and EV drivers often ask, “What outlet can I use to charge my electric car?” In this guide we’ll cover all common NEMA outlets for EV charging – from basic 120V Level 1 plugs to 240V Level 2 outlets. We’ll explain the configuration, amperage, voltage, wiring, and typical charging speeds for each. You’ll learn which EV chargers (and adapters) are compatible with each outlet, and get installation tips (think breakers, wiring, weatherproofing). We also compare costs so you can plan your EV outlet installation budget. Let’s dive in! Outlet Voltage Max Amps Breaker (A) Hot Wire (AWG) Ground Wire (AWG) Max EV Power (kW) NEMA 5-15 120V 15 15 14 14 1.3 NEMA 5-20 120V 20 20 12 12 1.7 NEMA 6-15 240V 15 15 14 14 2.8 NEMA 6-20 240V 20 20 12 12 3.8 NEMA 6-30 240V 30 30 10 10 5.7 NEMA 10-30 240V 30 30 10 10 5.7 NEMA 14-30 240V 30 30 10 10 5.7 NEMA 6-50 240V 50 50 6 10 9.6 NEMA 14-50 240V 50 50 6 10 9.6 Level 1 Outlets (120V) for EV Charging NEMA 5-15 (120V, 15A) – Standard Home Outlet The NEMA 5-15 is the typical 3-prong household outlet. It provides 120 volts at up to 15 amps. For EV charging, this means about 1.3 kW of power – roughly 3–5 miles of range per hour. It’s the slowest option (Level 1 charging), best for overnight or emergency charging. For example, charging a Tesla Model 3 fully could take 30+ hours on a 5-15 outlet. Configuration: Two flat vertical blades (hot and neutral) and a round/D-shaped ground. Wiring: Hot (black or red), Neutral (white), and Ground (green/copper). Use 14 AWG wire and a 15A breaker. Typical Use: Plug-in Level 1 portable EVSE (charging cable) fits into this outlet. Many EVs come with a Level 1 cord. It’s handy in a pinch, but charging is very slow. Charger Compatibility: Any 120V EVSE or the portable car charger in “Mode 2.” For example, AmazonBasics sells a 16A Level 1 charger that works with NEMA 5-15 outlets. Tesla’s Mobile Connector can also plug into 5-15 (with its adapter) for slow charging. Installation Tips: If using a 5-15 for EV, ensure the outlet and wiring are in good condition. Use a dedicated circuit if possible (other loads like appliances should be separate) and check with an electrician. Top EV Chargers Compatible with NEMA 5-15 Outlets Lectron Level 1 EV Charger – 120 V/15 A | NEMA 5-15 ETL‑certified, 16 ft cable, adds ~4–5 miles/hour. Highly rated (4.4★). Check Price Schumacher SEV1670 12 A Level 1 EV Charger Universal J1772 plug, 20 ft cord—good basic option with reliable build. Check Price Morec 15 A Level 1 EV Charger | NEMA 5-15 Plug Compact 20 ft cable, great value (~$106), good for smaller batteries. Check Price NEMA 5-20 (120V, 20A) – Higher-Capacity 120V Outlet The NEMA 5-20 looks like a 5-15 but one prong is horizontal. It’s wired for 20 amps at 120V, allowing up to 1.7 kW (about 4–5 miles per hour). Few EVSE units use it specifically, but it can speed up Level 1 charging a bit. Configuration: One horizontal slot, one vertical slot (hot wires), plus ground. Wiring: Use 12 AWG wire and a 20A single-pole breaker. Circuit is still single-phase 120V. Typical Use: Same as 5-15 but rated for heavier loads (usually kitchen appliances). It can support a higher-current Level 1 charger. Charger Compatibility: Some portable EV chargers support 20A draw and can come with a 5-20 plug or use an adapter. For instance, compact Level 1/2 chargers (8–16A) might include a 6-20 plug that can be swapped for a 5-20 adapter. Installation Tip: If you have a 5-15 circuit already and need a bit more power (and space in the panel), an electrician can upgrade it to a 5-20 (15A → 20A breaker and 12 AWG wiring). Always ensure a dedicated circuit breaker and avoid multi-use outlets. NEMA 5-20 (120 V, 20 A) (Same as NEMA 5‑15 models above with included 5‑15/5‑20 adapters.)For example, Lectron and Morec chargers work if fitted with a 5‑20 plug or adapter. Level 2 Outlets (240V) for EV Charging NEMA 6-15 (240V, 15A) – Entry-Level 240V Outlet The NEMA 6-15 is a 240-volt outlet with 15A capacity (2.8 kW output). It has two horizontal hot pins and a ground pin (no neutral). It’s much faster than 5-15 – up to roughly 12–16 miles of range per hour – but still at the low end for Level 2. Configuration: Two horizontal prongs (hot wires) and a round grounding hole. No neutral. Wiring: Hot (black and red), Ground (green). Use 14 AWG wire to a 15A double-pole breaker. Typical Use: Occasionally used for small welders or shop tools; not common for EVs but can be used. Charger Compatibility: You’d need a Level 2 EVSE that draws 12–15A. For instance, some portable 16A EV chargers (like basic J1772 cords) can plug into 6-15. Tesla’s older Gen 1 mobile connector included a 6-15 adapter. Installation Tip: Installing a 6-15 outlet requires adding a 240V circuit. Because it’s a 15A circuit, it’s continuous-rated at 12A for EV use. This outlet adds about 12–16 miles per hour of range. It’s an inexpensive upgrade (similar wiring and breaker as a 5-15). Use any 16 A Level 2 charger that supports 6‑15 plugs—many are similar to the 6‑20 options below. NEMA 6-20 (240V, 20A) – Common Level 2 Outlet The NEMA 6-20 is a 240V outlet rated for 20A (3.8 kW, ~15 miles/hour). Its shape is one horizontal blade and one vertical blade plus ground. It’s a popular DIY solution for modest Level 2 charging. Configuration: One horizontal, one vertical prong (hot wires) and a round ground pin. Wiring: Two hot (usually black & red) and ground. Use 12 AWG wiring with a 20A double-pole breaker. Charging Speed: At 240V×16A (continuous), it delivers ~3.8 kW. That’s about 12–15 miles of range per hour, which cuts charging time in half versus a 5-15. Typical Use: Many DIYers
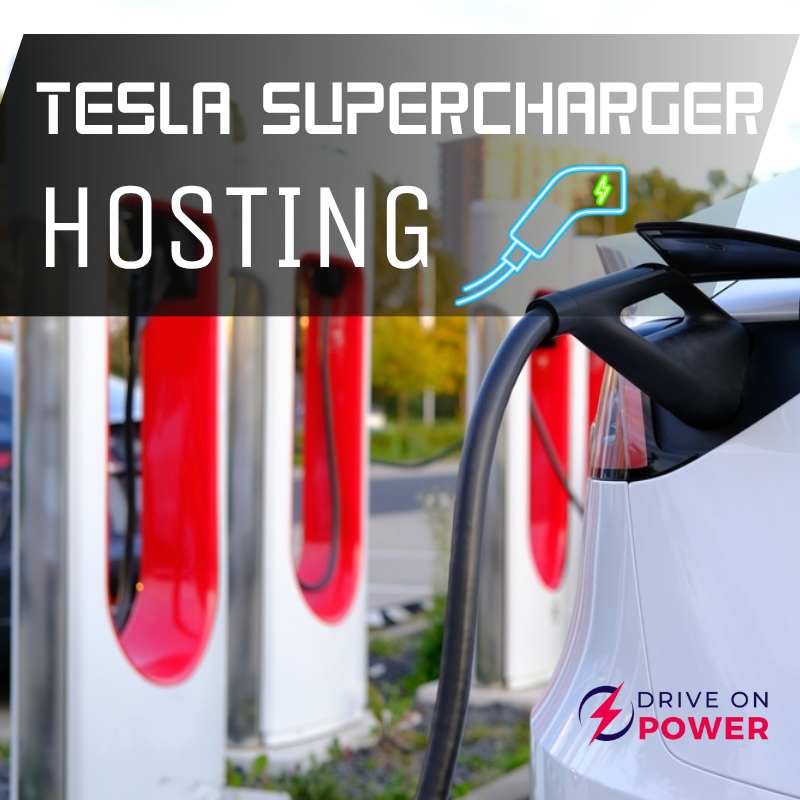
Tesla Supercharger Hosting Guide: Site Requirements, ROI & Incentives
Tesla Supercharger Hosting: Business Partnerships and ROI Tesla Supercharger stalls attract EV drivers and can boost nearby business traffic. Tesla builds, owns and operates the stations, partnering with property hosts (hotels, retailers, parking facilities, etc.). Tesla’s Supercharger network is a proprietary high-speed charging system built and operated by Tesla (over 17,000 plugs in the US). Unlike a franchise, Tesla partners with site owners: Tesla designs, pays for and maintains the chargers, while hosts provide the land and coordinate local requirements. Tesla handles equipment, construction and electricity (including grid fees) for Superchargers, so hosts incur minimal direct costs. In effect, hosting a Supercharger is a collaborative investment: you contribute the site and prepare it for high power, and Tesla invests in the EV charging infrastructure. Recommended: Best Lectron Tesla EV Chargers for Home and Travel Tesla Charger Adapters Tesla Cable Organizers How Tesla’s Supercharger Hosting Model Works Tesla owns the Superchargers and their operation. The company covers charger hardware, installation labor and ongoing maintenance. (Notably, Tesla also pays the electricity used at Supercharger sites, so hosts don’t face the energy bill for charging sessions.) In return, your business gains exposure to Tesla drivers via the in-car navigation system, which directs EVs to Superchargers. Tesla lists approved locations on its public map, driving traffic to host sites. (Tesla has even begun opening many Superchargers to all EVs with the NACS adapter, broadening the customer base). You are not charged fees or royalties by Tesla for hosting. Instead, you benefit from increased foot traffic and longer customer dwell time. In some cases, site hosts negotiate a lease or a small revenue share from charging fees, though most benefit indirectly through added sales. Key Point: Tesla treats hosts as partners. Tesla “manages construction and operation” of Superchargers on your site, so you have “nothing extra required. Hosts mainly provide the land and handle utilities/permitting. Recommended: Tesla’s Switch to the NACS Connector: What U.S. EV Drivers Need to Know Can Any EV Use a Tesla Charger? Explained for New EV Owners Site Selection and Host Requirements Successful Supercharger sites meet Tesla’s criteria for space, traffic and amenities. Key requirements include: Parking & Space: Typically 8–12 dedicated parking stalls (or more) are needed. Tesla generally looks for at least 8 parking spaces near amenities. The stalls should be grouped together, with room for charger pedestals or canopies. High Traffic Location: Sites on busy corridors, near highway exits, shopping centers, hotels or restaurants are preferred. Tesla’s in-car navigation will send EV drivers to the nearest Supercharger. Busy travel or commuter routes (often along Interstate corridors) maximize usage. Amenities & Dwell-Time Services: Proximity to restrooms, cafes, convenience stores, restaurants, and Wi-Fi is ideal. Studies show EV drivers spend charging time purchasing snacks and coffee – businesses near chargers see an average +$1,500 in annual sales post-install. Sites with shopping, dining or entertainment encourage longer stays and extra revenue. Ease of Access: Level, well-lit sites with clear signage (and easy entry/exit for vehicles) improve the customer experience. ADA-compliant parking layouts (11×20 ft stalls for accessibility) and pedestrian paths should be included. Utility Capacity: Your property must handle the heavy electrical load. Superchargers typically require high-voltage three-phase power (commonly 480V AC or medium-voltage distribution with on-site transformers). Discuss with your utility early to confirm capacity. Tesla will specify exact power needs, but in general plan for megawatt-scale service (e.g. V3 Supercharger stalls can draw ~250 kW each). By meeting these criteria, hosts tap into Tesla’s EV driver base. As one analyst notes, “if you own or lease a shopping center, hotel, gas station, or even a parking lot, you could be eligible to host Tesla Superchargers—turning your property into a revenue-generating asset. Approval and Installation Process: Step by Step Pre-Application: Assess feasibility. Engage Tesla early by visiting the Tesla Host Application page. Prepare basic info: address, site plan, expected stall count, nearby amenities, and existing electrical capacity. In parallel, consult your utility to estimate upgrade costs. Submit Application: Through Tesla’s site or sales team. Provide details on location, property owner contact, traffic counts, and amenities. Tesla will evaluate factors like traffic demand and grid readiness. According to Tesla sources, approval can take several months. Site Survey & Agreement: If preliminarily accepted, Tesla conducts an on-site survey with engineers. They confirm space for chargers, check electrical service, and work with you on a draft agreement. Tesla generally covers site preparation related to the chargers themselves. You will agree on responsibilities (often you handle site prep, Tesla handles chargers). Permitting & Utility Coordination: Initiate permits for electrical work, construction, and any zoning updates. Coordinate with the local utility for a make-ready service connection (new transformer, meter, conduit, etc.). Many utilities offer “make-ready” incentives to offset these upgrades. This phase can take weeks to months depending on local processes. Construction & Installation: Tesla schedules the build. Their installation teams will pour pads, mount pedestals or canopies, trench cables, install hardware and signage. Tesla’s standard approach is fast: some sites report prefabricated components that allow installation in as little as 1–2 weeks once permits and power are ready. Commissioning: After installation, Tesla tests each charger, integrates payment systems, and activates the site on the Tesla network. Once live, the chargers automatically appear on Tesla’s map (and soon on third-party mapping for NACS adapters). Throughout this process, Tesla “manages construction and operation” on your site. The host’s project manager role is typically to coordinate permits, utility access, and site prep. Cost Breakdown: Tesla Supercharger Installation Cost Tesla’s model greatly reduces host costs. Tesla covers: Charger hardware and installation – Tesla owns the Supercharger units and pays for erection of the equipment and canopies. Maintenance and Repairs – Any upkeep or repairs on chargers is Tesla’s responsibility. Electricity at the chargers – Unlike slower destination chargers, Tesla pays the power cost for Supercharger stalls. (Sites are not billed for kWh used; Tesla bills the driver and covers the bill.) Hosts’ responsibilities and costs typically include: Site Preparation: Clearing land, grading, paving or restriping parking, installing
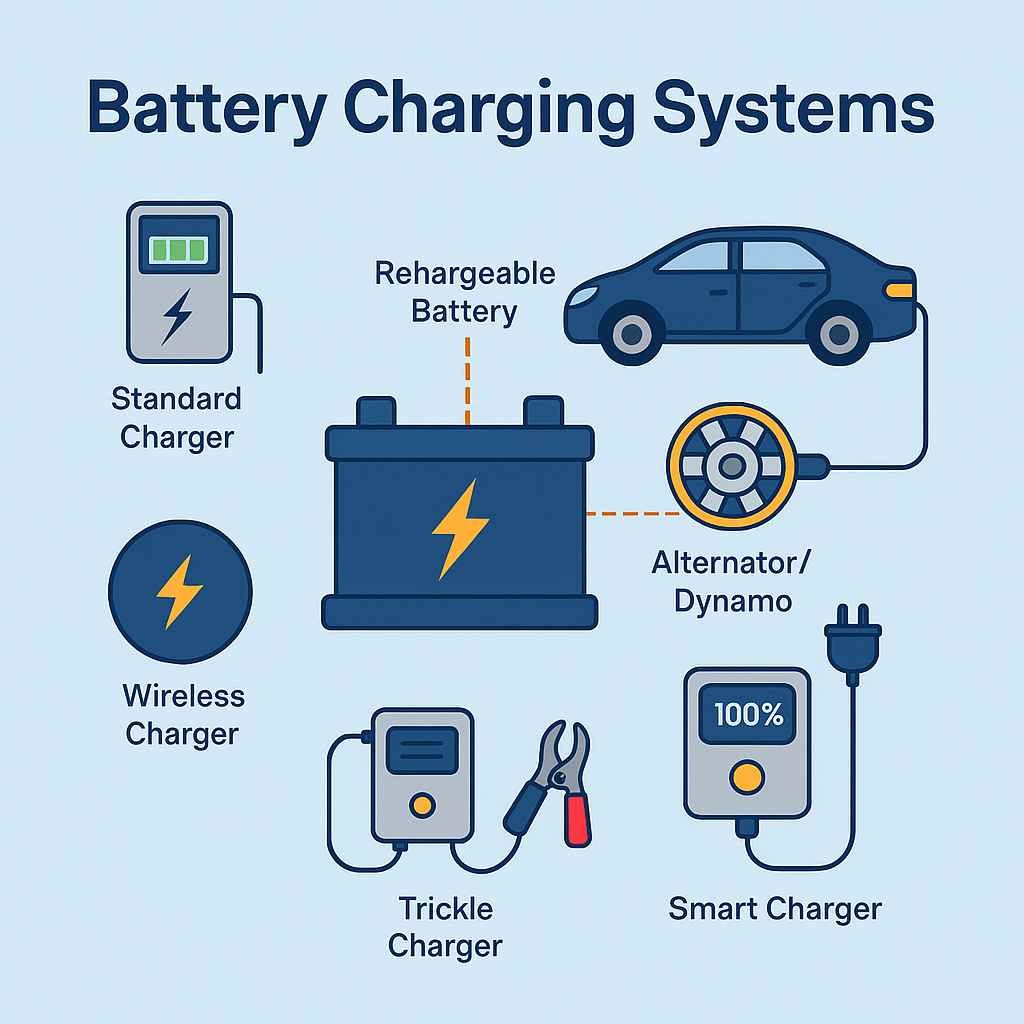
EV Charging Systems & Methods
EV Charging Systems & Methods Electric vehicle (EV) charging systems encompass all the hardware, connectors, and software that deliver electricity to charge EV batteries. These systems include the charging units (EVSE), cables and connectors, onboard chargers in the vehicle, and communication/control protocols. EV adoption is growing rapidly; for example, plug-in EVs accounted for about 9.1% of U.S. light-duty vehicle sales in 2023. A reliable and efficient charging infrastructure is therefore critical. This guide explains the components of EV charging systems, different charger types (Level 1, Level 2, DC fast), charging methods (wired, wireless, smart), and infrastructure considerations (home, commercial, public). It also covers connector standards (CCS, CHAdeMO, Tesla’s NACS, ISO 15118), battery maintenance and safety, management software/payment solutions, and emerging trends like solar-powered and bidirectional charging. Recommended: NEMA EVSE Charging Station Installation Guide (Wall, Pole, Pedestal Mounts) Key Components of EV Charging Systems EV charging involves several key pieces of equipment and technology: Onboard Charger (AC-to-DC Converter): Inside every EV is an onboard charger that converts alternating current (AC) from Level 1/Level 2 chargers into direct current (DC) for the battery. In contrast, DC fast chargers supply DC power directly to the battery, bypassing the onboard AC charger. Electric Vehicle Supply Equipment (EVSE): The charging station or wall box contains power electronics. Level 1 and Level 2 EVSE units provide AC power (which the onboard charger converts). DC fast EVSE units provide DC power directly (e.g. 50–350+ kW) to the car’s battery. EVSE also houses safety features (ground-fault protection, insulation, cooling fans, etc.). Connectors and Cables: The plug and socket are standardized for interoperability. For AC charging in North America, the SAE J1772 connector is universal for Levels 1 and 2. For DC fast charging, the Combined Charging System (CCS) is the common standard (it uses the J1772 form factor plus two large DC pins). CHAdeMO is another DC standard (common on older Japanese EVs). Tesla uses its proprietary NACS connector in the U.S., which Tesla Superchargers and Destination Chargers employ. (Non-Tesla vehicles can access Tesla stations with adapters.) These connector types are detailed in U.S. charging guidelines. Communication Protocols: Chargers and cars exchange information. J1772 AC charging uses a simple pilot/PWM signal to control charge rate. Newer digital standards like ISO 15118 enable secure communication, smart charging, and “Plug & Charge” (where the car and station authenticate automatically with certificates. For networked stations, the Open Charge Point Protocol (OCPP) is widely used; it provides a uniform way for any charger to talk to any central management system. Safety and Control: EVSE units monitor voltage, current, and ground faults to ensure safe operation. Charging systems must meet UL/CSA standards for EV equipment. Vehicles and chargers also implement thermal management (cooling/heating) to keep components within safe temperature ranges. Types of EV Chargers EV chargers are generally categorized by power level and charging speed. The main classes are Level 1, Level 2 (both AC), and DC Fast Chargers (Level 3). Level 1 Chargers Power & Use: Level 1 chargers use a standard 120 V household outlet (NEMA 5-15). They deliver about 1–1.4 kW, adding roughly 4–5 miles of range per hour of charging. Installation: No special install is needed beyond plugging into an existing outlet. Use Case: Best for very low daily use or plug-in hybrids. For a full EV battery, expect tens of hours (e.g. 40–50 hours to 80% on a 60 kWh battery. Pros: Very low cost (the cord is usually included with the EV), works on any outlet, easy setup. Cons: Extremely slow; impractical for larger-battery EVs on regular use. Level 2 Chargers Figure: Level 2 EV charging stations are commonly installed in homes, workplaces, and parking areas. Level 2 chargers use 240 V (residential) or 208 V (commercial) AC power. A typical Level 2 outlet (30 A) provides ~7.2 kW, which translates to about 10–25 miles of range per hour. Many EV drivers install Level 2 charging at home or work, which can fully charge most EVs overnight (4–10 hours to 80% for a ~60 kWh battery). Installation: Requires a dedicated 240 V circuit. Homeowners must often hire an electrician and possibly upgrade the electrical panel. Public/work chargers are hardwired to higher-power circuits (e.g. 40–80 A). Cost & Speed: Level 2 stations cost a few hundred dollars for home units, more for commercial. Charging adds ~25 miles/hour on a 7 kW unit. Tesla offers its own Level 2 (NACS) Destination chargers, and all Teslas come with an adapter to use standard J1772 Level 2 stations. Pros: Much faster than Level 1; widely available; suitable for everyday use at home or in parking lots. Cons: Higher equipment/install cost; still requires several hours for a full charge; requires 240 V power. DC Fast Chargers (Level 3) Figure: DC Fast Charging station (Level 3) providing very high-power charging for rapid top-ups. DC Fast Chargers (DCFC) supply high-voltage DC directly to the battery, bypassing the onboard AC charger. They typically provide 50–350+ kW of power. At 150 kW, a fast charger can add roughly 100–150 miles of range in 20–30 minutes. (Charging slows dramatically after ~80% state of charge to protect the battery. Installation: These stations are complex. They require three-phase high-voltage power, large power electronics, and often active cooling (fans or liquid) for the charger. Installation costs tens to hundreds of thousands of dollars per site. Use Case: DCFC are installed at highway rest areas, major travel corridors, commercial fleet depots, and some urban hubs. They enable long-distance travel by providing a quick “refueling” stop. Connectors: In the U.S., most DCFC stations use CCS (the Combo1 connector). Some older stations use CHAdeMO (Nissan, Mitsubishi). Tesla’s Superchargers use the NACS connector (formerly called J3400); Tesla vehicles can use them natively, and other EVs are beginning to get adapters to use Tesla chargers. Pros: Fastest way to recharge an EV; essential for highway travel. Cons: Very expensive infrastructure; high demand on the electrical grid; can accelerate battery wear if used frequently and charged to 100%. Charging Methods: Wired, Wireless, and Smart Charging Wired (Plug-In) Charging: The standard method involves physically plugging a cable into the vehicle. All the charger types above are wired. It is the most mature and efficient method. Wireless (Inductive) Charging: This uses electromagnetic
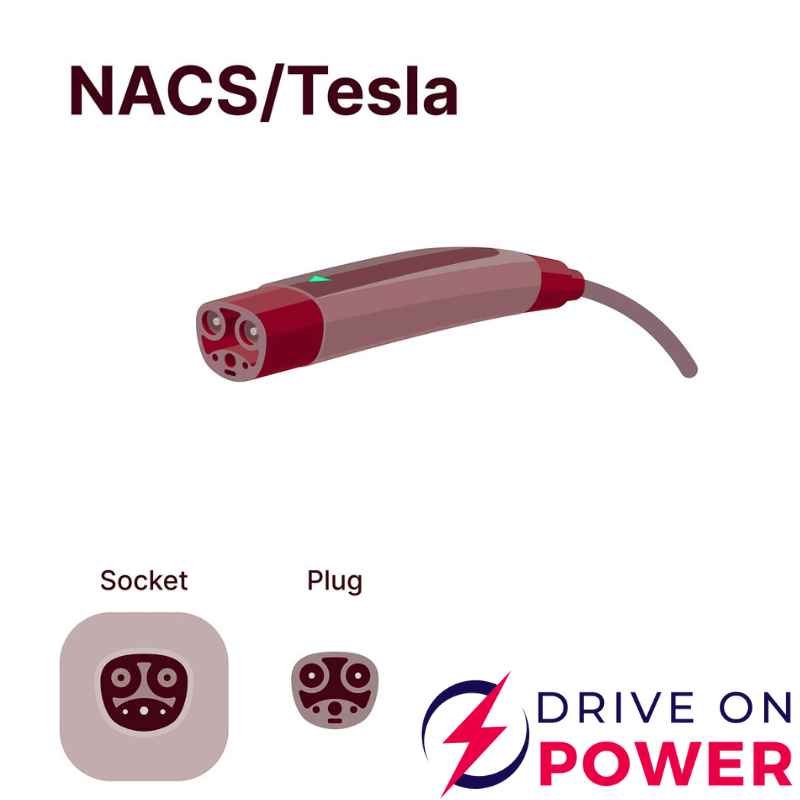
Tesla’s Switch to the NACS Connector: What U.S. EV Drivers Need to Know
Tesla’s Switch to the NACS Connector Tesla has always done things a little differently, and now that includes how electric vehicles charge. The North American Charging Standard (NACS) is Tesla’s name for the charging plug it has used since 2012. What makes it unique is that it combines both AC (home charging) and DC (fast charging) into a single, slim 5-pin plug. Unlike other connectors that require separate plugs for slow and fast charging, NACS keeps it simple. In late 2022, Tesla officially opened up the NACS design for all automakers and charging networks. That move invited other brands to start using Tesla’s plug as a universal standard across North America. The big idea here is to create one plug for all EVs — replacing or supplementing the older Combined Charging System (CCS) standard that most non-Tesla vehicles currently use. Right now, all Tesla vehicles and Superchargers use the NACS plug exclusively. It’s designed for high power, with versions that handle 500V and even 1000V. Tesla’s latest Superchargers can pump out around 250–325 kW through this connector — that’s enough to add hundreds of miles of range in just 20–30 minutes. For regular home charging, the same plug supports 240V Level-2 power, up to about 48 amps (around 11.5 kW). So, in real-world driving, NACS and CCS offer similar charging speeds — but NACS is quickly becoming the go-to choice thanks to Tesla’s leadership and charging network size. If you’re just getting into EV charging at home, you might also want to check out our NEMA EVSE Charging Station Installation Guide (Wall, Pole, Pedestal Mounts) for a detailed breakdown of setup options. Why Tesla Opened NACS (and Why It Matters) Let’s be real — Tesla’s Supercharger network is already the largest and most reliable fast-charging system in the U.S. There are over 15,000 Tesla Supercharger stalls out there, which is about 60% more than all CCS charging stations combined. On top of that, more Teslas are on the road than any other EV brand — roughly a 2-to-1 ratio compared to CCS-equipped vehicles. With so many Tesla plugs already in place, it didn’t make sense to rip out or retrofit thousands of charging stations. Instead, Tesla chose a smarter approach: “change the car, not the station.” So they made their connector public and invited other automakers to build it into their vehicles. For Tesla owners, nothing changes — you’ll still plug in and charge as you always have. But now, non-Tesla EV drivers will soon be able to charge at Superchargers too. That’s a big win for everyone. It increases the number of people who can use the Tesla network and encourages automakers to promote their vehicles as “Supercharger compatible.” From a business perspective, Tesla gets more customers at their stations. And for drivers, it moves us closer to a universal charging setup — something that’s been missing in the EV world. Curious if your non-Tesla EV can use Tesla Superchargers? Don’t miss our guide: Can Any EV Use a Tesla Charger? Explained for New EV Owners. NACS vs. CCS: What’s the Real Difference? Here’s a straightforward look at how NACS stacks up against CCS: 1. Connector Design NACS uses one simple, compact plug for both AC and DC charging. CCS1 (used in the U.S.) combines a regular J1772 plug with two large DC pins, making it bulkier. NACS uses the same power pins for both charging types, which keeps the design lightweight and easier to handle. 2. Charging Speed Both systems are powerful. CCS1 is rated up to 1000 volts and 500 amps (around 360 kW), and NACS is right in the same ballpark. Tesla’s latest Superchargers currently deliver around 250–325 kW. That’s more than enough for most long road trips. For home charging, NACS handles standard 240V Level-2 speeds (up to 11.5 kW), same as CCS. 3. Charging Network This is where NACS really pulls ahead. Tesla’s network of Superchargers is widespread and well-maintained. As of early 2025, there are about 36,500 public fast-charging ports with NACS connectors in the U.S. — including Tesla Superchargers and third-party stations. By comparison, there are only about 17,000 CCS ports. So if you’re driving a NACS-equipped car, your charging options are much better. Feature NACS (Tesla Plug) CCS (Combined Charging System) Connector Size Slim, single-piece design Bulkier, two-piece (J1772 + DC pins) Charging Type AC and DC charging in one connector Separate pins for AC and DC Max Charging Power Up to 1000V / ~900A (~325 kW) Up to 1000V / 500A (~360 kW) Ease of Use Simple to plug in and handle Larger, can be heavier and trickier to insert Used By (2025+) Tesla, Ford, GM, Volvo, Hyundai, and more Some older EVs and certain non-Tesla chargers Charging Networks Tesla Superchargers + growing NACS support Electrify America, EVgo, and other CCS stations AC Home Charging Up to 240V, ~48A (~11.5 kW) Similar Level-2 support via J1772 Planning to set up your own home charging station? Read our step-by-step tutorial: How to Install a NEMA 14‑50 Outlet for Your EV Charger. What This Means for EV Drivers If You Own a Tesla: Nothing changes for you. Your vehicle already uses the NACS connector, and you’ll continue using Superchargers as usual. The main difference is that you might start seeing other EV brands using the same stations, which could lead to faster expansion of the network. If You Own a Non-Tesla EV With a CCS Port: You’ll need an adapter to charge at Tesla Superchargers. The good news is that automakers like Ford and GM started offering free CCS-to-NACS adapters in 2024 for vehicles like the Mustang Mach-E, F-150 Lightning, and Chevy Blazer EV. Tesla recommends using only official adapters, not third-party ones, to avoid safety issues. If You’re Buying an EV in 2025 or Later: Almost every new EV sold in the U.S. starting in 2025 will come with a built-in NACS port. Brands like Ford, GM, Volvo, Mercedes, Hyundai, Kia, and Lucid are all on board. That means you’ll
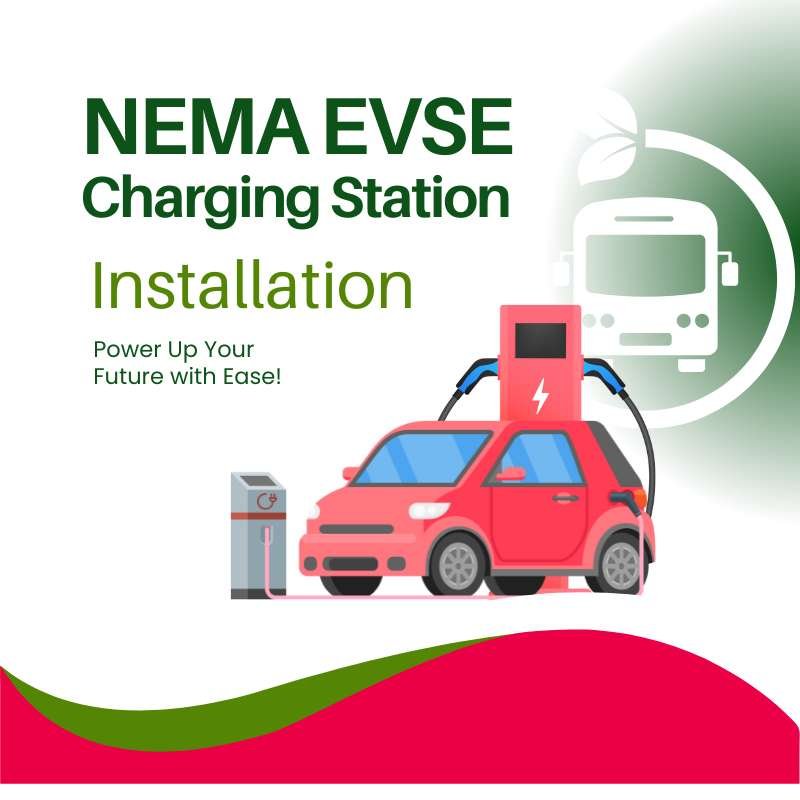
NEMA EVSE Charging Station Installation Guide (Wall, Pole, Pedestal Mounts)
NEMA EVSE Charging Station Installation Guide If you’re looking to install a NEMA EVSE Charging Station at home or for commercial use, understanding the proper installation method is key. This guide covers essential instructions, mounting options (wall-mount, pole-mount, pedestal, and back-to-back), safety steps, and required tools. Everything here is based on manufacturer documentation and real installation practices. Before You Start: Installation Prep Checklist Before diving into the physical installation of your EV charger, review all included technical drawings (front, plan, and connection views). These will help you follow local codes and ensure proper placement of the EVSE unit. Safety Instructions You Shouldn’t Skip Wear safety glasses when working with electrical tools or wiring. Do not connect power while making or modifying wire connections. Always follow lockout/tagout protocols when the unit is energized. Use only the recommended tools to ensure proper fit and torque. Supported Installation Types for NEMA EVSE Stations The NEMA EVSE charger is built to accommodate various mounting configurations: Wall-MountedIdeal for garages or exterior home walls. Requires mounting screws and wire access through walls. Pole-MountedGreat for open parking lots or curbside installs. Offers vertical mounting using a conduit pole and secure bracket attachments. PedestalA free-standing unit for parking areas. Common in commercial or multi-unit properties. Back-to-Back PedestalEnables two EV chargers on a single pedestal – perfect for high-traffic EV stations. Each configuration follows ADA standards for accessibility and mounting clearance. Torque Specs & Tools You’ll Need Here are the main torque settings and fasteners: Screw Size Torque Tolerance 5-32 UNC 13 in-lb ±2 in-lb 1/4-20 UNC 30 in-lb ±5 in-lb GROUND TERM. SCREWS 38 in-lb ±5 in-lb 3/8″ LOCKNUT Hand Tight + ¼ Turn – Tools Required: Slotted Screwdriver (3/16” or ¼”) Phillips #2 Screwdriver Socket Set (7/16”, ⅜”) Drill + wall anchors Wire stripper, hammer, and level Wire Size and Field Cable Guidance To ensure safe and proper power delivery: Wall or Pole Mounts:Use Cu 8 AWG, rated for 75°C minimum. Pedestal Mounts (Single or Double):Use Cu 6 AWG, rated for 90°C minimum. Be sure the wire is copper and properly rated for electrical code compliance. What’s in the Box: Pedestal Installation Parts Item Description Quantity 1 Kiosk Pedestal Unit 1 2 Base Mounting Assembly 1 3 Kiosk Skirting 1 4 Base Mounting Template (NEMA 3R) 1 5 Hex Nut, ¼” SS 12 6 Star Washer, External Tooth, ¼” SS 8 Why Choose NEMA EVSE Charging Stations? NEMA-compliant EVSE chargers are preferred for both home and commercial setups because: They meet safety standards and ADA accessibility Compatible with multiple mounting options Support high-current charging (Level 2) Work well with a NEMA 14-50 outlet, which is standard for EV setups Related: How to Install a NEMA 14‑50 Outlet for Your EV Charger EV Charger Reviews: Level 1, 2, and 3 Chargers Compared Tesla vs Non-Tesla Charging Compatibility Portable EV Chargers with NEMA 14‑50 Support How to Choose the Right Home EV Charger (2025) Recommended NEMA 14-50 Compatible Chargers Top Hardwired EV Chargers – Power Up Your Home ChargePoint HomeFlex Level 2 EV Charger (Hardwired) Power Output: Adjustable up to 50 A (12 kW); add about 37 miles/hr Smart Connectivity: Wi‑Fi-enabled with app controls and scheduling Flexible Setup: Capable of hardwiring or using NEMA 14‑50/NEMA 6‑50 Ideal For: Smart, future-proof home charging with app integration User Feedback: Rated 4.4★ Check Price Grizzl‑E Classic Level 2 Charger (Hardwired or Plug-In) Power Output: Up to 40 A (10 kW); adjustable from 16–40 A Rugged Build: Aluminum enclosure rated IP67; proven durable in tough conditions Simple Setup: Hardwire or use NEMA 14-50/NEMA 6-50 plug Ideal For: Those needing a no-frills, heavy-duty charger built to last Praise: Called a “workhorse” for reliability and durability User Feedback: Rated 4.6★ Check Price JuiceBox 40 Smart EV Charging Station (NEMA 14-50) Charging Level: Level 2 Amperage: 40A Plug Type: NEMA 14-50 Cable Length: 25 feet Weatherproof: Yes (NEMA 4X rated) Smart Features: Mobile app, scheduling, Alexa integration ol and clean design Check Price Emporia Smart Level 2 EV Charger (NEMA 14-50) Amperage: Up to 48A Plug Type: NEMA 14-50 or hardwired Cable Length: 24 feet Weatherproof: Yes (IP66 enclosure) Smart Features: Wi-Fi app, energy usage tracking, load management Check Price Autel Home Smart Level 2 EV Charger (Hardwired) Power Output: Up to 50 A; Wi‑Fi/Bluetooth smart controls Installation: Hardwired and suitable for indoor or outdoor use Ideal For: EV drivers who want smart charging and flexible power delivery User Feedback: Rated 4.5★ Check Price Lectron Level 2 EV Charger – ETL Certified 40 Amp (NEMA 14-50) This J1772 charger is compatible with all electric vehicles, including Mercedes, BMW, Ford, Honda, Hyundai, Kia, Porsche, Nissan, and Chevy FCC and ETL certified (UL2594 standard) for safety with overvoltage, overcurrent. PORTABLE EV CHARGER – Enjoy Level 2 charging anytime, anywhere with this portable EV charger. Check Price Brand Model Amperage WiFi App? UL Listed Price Range ChargePoint Home Flex 50A Yes Yes $649–$699 JuiceBox 40 40A Yes Yes $599–$639 Grizzl-E Classic 40A No Yes $399–$449 Lectron Level 2 Portable 40A No Yes $249–$299 Emporia Smart EV Charger 48A Yes Yes $399–$479 ⚠️ Troubleshooting – Post-Installation Power Issues 1. Charger Not Powering On Check breaker and outlet voltage (should be 240V) Ensure plug fits fully into NEMA 14-50 outlet Reset GFCI if your outlet has it 2. Red/Flashing Lights on EVSE Usually indicates grounding or wiring error Recheck wire connections and torque specs Consult EVSE manual or contact support 3. Slow Charging or Error Codes Confirm EV settings on the vehicle side Try another EV to isolate issue Test cable resistance with multimeter Cost Breakdown (Labor + Material) Here’s a simple chart for readers to understand total installation cost: Item Estimated Cost NEMA 14-50 Outlet Installation $200 – $400 EVSE Charger (NEMA Plug-in) $399 – $699 Mounting Hardware (Wall/Pad) $50 – $120 Pedestal Kit (if needed) $200 – $400 Electrician Labor $300 – $600 Total Estimate $950 – $2,200 This range gives readers a real-world idea of costs, whether it’s DIY or professional. FAQs Can I install a NEMA EVSE charger myself? Yes, if you’re comfortable working with

How to Install a NEMA 14‑50 Outlet for Your EV Charger
How to Install a NEMA 14‑50 Outlet for Your EV Charger Installing a NEMA 14‑50 outlet is one of the most practical and cost-effective ways to enable Level 2 EV charging at home. It’s commonly used with portable EV chargers and works well for Tesla, Chevy Bolt, Nissan Leaf, and other major EV models. In this guide, you’ll learn exactly how to install one safely, legally, and efficiently. Why Choose a NEMA 14‑50 Outlet? A NEMA 14‑50 outlet supports 240 volts at 50 amps, which is ideal for Level 2 EV chargers. This type of outlet is the same one used for electric stoves and RV hookups. Benefits: Charges most EVs overnight (up to 37 miles per hour) Compatible with plug-in Level 2 chargers (including Tesla Mobile Connector with adapter) Cheaper than hardwired EVSEs Reusable if you switch homes or vehicles Electrical Requirements Before installing a NEMA 14‑50 outlet, check the following: Service Panel Capacity: Must handle a 50-amp load. A 200-amp panel is ideal. Available Breaker Slot: A double-pole breaker is required. Wire Gauge: Use 6 AWG copper (minimum) or 8 AWG if allowed by code for short runs. Conduit or Raceway: Required for surface wiring (especially in garages). Permit: Check your city/county electrical permit rules. Pro Tip: Always confirm your area’s version of the NEC (National Electrical Code) and local regulations before you begin. Tools and Materials Needed UL-listed NEMA 14‑50 receptacle 50A double-pole circuit breaker 6/3 NM-B copper wire or THHN in conduit Weatherproof box (if outdoors) Conduit and straps Wire strippers, screwdriver, voltage tester GFCI breaker (required in many areas) Step-by-Step Installation Guide 1. Turn Off the Main Breaker Safety comes first. Cut off power at the main panel and verify with a voltage tester. 2. Mount the Outlet Box Install it on a stud about 18–24 inches above the garage floor or driveway wall. 3. Run the Wire Pull the wire from the panel to the outlet location using conduit if necessary. 4. Wire the Receptacle Red and Black wires go to the hot terminals (X and Y) White wire connects to neutral Green or bare copper goes to the ground 5. Install the Breaker Install the 50A double-pole breaker in your panel. Connect wires to the correct terminals. 6. Power On and Test Turn power back on and test the outlet with a voltage meter or plug in your EV charger. Plug-In vs. Hardwired Chargers: What’s Better? Feature Plug-In (NEMA 14‑50) Hardwired Charger Installation Cost Lower Higher (Electrician needed) Flexibility Can unplug or move Permanent Safety (Outdoor Use) Requires weatherproof box Often better sealed EV Compatibility High (with adapters) High Recommendation: A plug-in setup is ideal if you want mobility or rent your home. Hardwired units are great for permanent home installations. ⚠️ Code and Safety Guidelines Use GFCI breakers as required (especially in garages or outdoors per NEC 2020). Always use UL-listed components Verify installation meets National Electrical Code (NEC) standards If unsure, hire a licensed electrician for installation and permit handling Keep outlet protected from weather and impact. Cost Breakdown Item Estimated Cost NEMA 14‑50 Outlet $20 – $50 6 AWG Copper Wire $100 – $200 (25–50 ft) Breaker & Electrical Box $30 – $60 Labor (Electrician) $300 – $800 Permit (if required) $50 – $200 Total Estimated Cost: $500 – $1,300 NEMA 14‑50 vs. NEMA 6‑50: Which to Choose? Feature NEMA 14‑50 NEMA 6‑50 Voltage/Amperage 240V / 50A 240V / 50A Neutral Wire Yes No Applications EVs, RVs, stoves EVs, welders Charger Compatibility Very High Limited Verdict: NEMA 14‑50 is more versatile and future-proof for EV charging. Frequently Asked Questions Q1: Can I install a NEMA 14‑50 myself? If you have experience with electrical wiring and your city allows DIY electrical work, yes. Otherwise, hire a licensed electrician. Q2: Is a permit required? In most areas, yes. This ensures your installation passes inspection and meets code. Q3: Do Tesla owners need a different outlet? No. Tesla’s Mobile Connector works with a NEMA 14‑50 plug using the correct adapter. Q4: How long does installation take? Typically 2–4 hours for a professional. DIY may take longer depending on prep and experience. Compatible EV Chargers with NEMA 14‑50 Support EV Charger Level Max Amps Compatible with Tesla Portable ChargePoint Home Flex 2 50A Yes (with adapter) No Grizzl-E Level 2 Charger 2 40A Yes (with adapter) Yes Lectron V-Box 2 48A Yes (with adapter) No Emporia Level 2 Charger 2 48A Yes (with adapter) No MUSTART Travel Charger 2 40A Yes (with adapter) Yes Related: EV Charger Reviews: Level 1, 2, and 3 Chargers Compared Tesla vs Non-Tesla Charging Compatibility Portable EV Chargers with NEMA 14‑50 Support How to Choose the Right Home EV Charger (2025)